.svg)
.svg)
How to create and configure a new Button?
Configure Jira buttons with custom design, display rules, actions, templates, and behaviors.
1. How to create a new Button using the App Configuration Panel ?
Required Jira Role: Jira Software Administrator
- Click on Setting > Apps
- Navigate to the Create and Link App
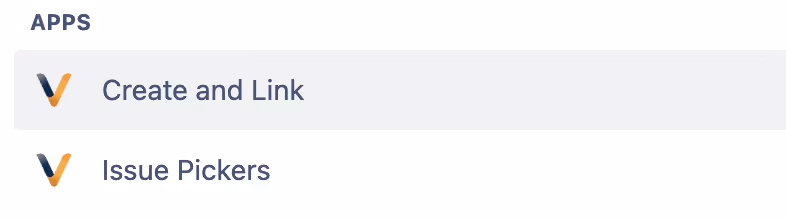
Click on the following Button to create a new Issue Picker

2. How to configure the Button - Look & Feel ?
Required Jira Role: Jira Software Administrator
During the creation Phase of the Button, the following Look & Feel parameters should be completed:

| Parameter | Syntax | Description |
|---|---|---|
| Label |
Text Mandatory |
Provide a name for your Button. |
| Description |
Text Optional |
Describe your Button. |
| Enabled |
Checkbox Default: Yes |
Toggle the Button between enabled, usable by Jira users, and disabled, temporarily removed from view screens. |
| Text Color |
Hex Color Codes Default: #43536e |
Use the Color picker to configure the Button Text Color.

|
| Background Color |
Hex Color Codes Default: #f5f6f7 |
Use the Color picker to configure the Button Background Color. |
| Highlight Text Color |
Hex Color Codes Default: #43536e |
Use the Color picker to configure the Button Highlight Text Color. |
| Highlight Background Color |
Hex Color Codes Default: #f5f6f7 |
Use the Color picker to configure the Button Highlight Background Color. |
| Round |
Checkbox Default: No |
Toggle between round and normal Buttons. |
| Icon | Default: No Icon |
On the left side of the Button Text, you can add an Icon.
The App provides the following Icons:
If you need another Icon, please check this page and let us know which Icon we should add:
https://atlassian.design/components/icon/icon-explorer |
3. How to configure the Button - Display Settings ?
Required Jira Role: Jira Software Administrator
Please switch to the second Tab “Display Settings” to define where and when the button should be displayed:

4. How to configure the Button - Action Settings ?
Required Jira Role: Jira Software Administrator
Please switch to the second Tab “Action Setting” to complete the Button Configuration, and configure which issue type should be created and linked:

4. How to configure the Button - Create Behaviours ?
Required Jira Role: Jira Software Administrator
Please switch to the second Tab “Create Behaviours” to complete the Button Configuration, if you want to add Behaviours to the Create Screen and refer to the documentation here:

Integrate your CRM with other tools
Venenatis sollicitudin posuere elit consequat et enim. Neque tortor amet dictum tempor. Leo facilisis aliquet viverra scelerisque eleifend viverra est. At massa erat vel amet enim laoreet dictum pellentesque. Urna cursus quam pulvinar tellus. Duis fermentum nibh volutpat morbi. Et ac sed ultricies ut nunc.
How to connect your integrations to your CRM platform?
Et urna ac et maecenas fusce amet. Nibh nec commodo massa sed. Tincidunt porttitor in pharetra egestas sit neque ac lacus. Amet a nunc et cum. Odio at volutpat volutpat in leo eget ipsum diam elementum. Erat magna arcu orci.
- Morbi fringilla molestie magna sed dictum. Praesent pharetra.
- Cras mi purus, viverra vitae felis sit amet, tincidunt fringilla lorem.
- Non mattis urna ex nec sem. Donec varius diam et suscipit.
- Quisque euismod posuere lacus sit amet volutpat praesent.
Quis faucibus massa sit egestas. Sit fermentum est ac pulvinar et sagittis sed sit ut. Quis faucibus aenean nibh vestibulum enim mi sit. Sollicitudin ultrices ultrices in ipsum urna fringilla massa leo. Sapien ultricies vitae rhoncus molestie purus. Urna urna dolor euismod porttitor et. Magna adipiscing dictum et adipiscing.

Quis faucibus massa sit egestas. Sit fermentum est ac pulvinar et sagittis sed sit ut. Quis faucibus aenean nibh vestibulum enim mi sit. Sollicitudin ultrices ultrices in ipsum urna fringilla massa leo. Sapien ultricies vitae rhoncus molestie purus.
Infotech is the next-gen CRM platform designed for modern sales teams
Cursus curabitur euismod vel fermentum sapien non dolor odio vel. Tortor lectus mauris in praesent a tincidunt nam. In aenean odio aliquet pretium viverra elit quis magna. Eget ut risus posuere velit purus nisi nec sollicitudin tellus enim.
“Sed id mi eget urna facilisis pharetra. Nunc viverra est at magna maximus consectetur. Sed nec maximus augue. Aliquam commodo sem eu.”
Cursus curabitur euismod vel fermentum sapien non dolor odio vel. Tortor lectus mauris in praesent a tincidunt nam. In aenean odio aliquet pretium viverra elit quis magna. Eget ut risus posuere velit purus nisi nec sollicitudin. Tellus enim interdum neque sit vestibulum lacus. Nam pulvinar a lectus justo aliquet.
Why using the right CRM can make your team close more sales?
Sed non quis tellus velit orci. Quam sed mauris elementum tempor viverra. Luctus semper risus ipsum id diam praesent. Pretium eget mauris ultrices curabitur sed sem amet. Erat nulla habitant in mattis massa mi adipiscing.
- Morbi fringilla molestie magna sed dictum. Praesent pharetra.
- Cras mi purus, viverra vitae felis sit amet, tincidunt fringilla lorem.
- Non mattis urna ex nec sem. Donec varius diam et suscipit.
- Quisque euismod posuere lacus sit amet volutpat praesent.
What other features would you like to see in our product?
Sed non quis tellus velit orci. Quam sed mauris elementum tempor viverra. Luctus semper risus ipsum id diam praesent. Pretium eget mauris ultrices curabitur sed sem amet. Erat nulla habitant in mattis massa mi adipiscing ullamcorper condimentum. Erat quisque integer tincidunt ac amet.